 |
The RTmon GDI has been deprecated and may be removed in a future release.
|
The RTmon GDI has many built-in child windows for monitoring and managing specifics about your project.
This section is more helpful if you read it as you walk through a session with the RTmon GDI on your system.
Throughout the RTmon session, informational windows appear alerting you when an urgent condition occurs or providing instructions. The most commonly seen informational window appears when RTmon is invoked before a project is specified in the rtmon.cm file, as described in Starting a Graphical Development Interface Session.
After reading the information in provided in the window, click OK to close the window and move on.
Select Watch > Project Name from the Main menu to choose a new project. The Project Browser window appears. The Project Browser window presents a list of the current projects known by the RTserver processes. Highlight the project you want to monitor. Select Change Project or double click on the project name to select that project. Click on Close to close the window.
You can source a command file (File > Source Cmd File), edit an existing command file (File > Edit Cmd File), or save a command file (File > Save Cmd File). After making your menu selection, a Command File window appears. To select the command file, choose a directory and filename, then click OK.
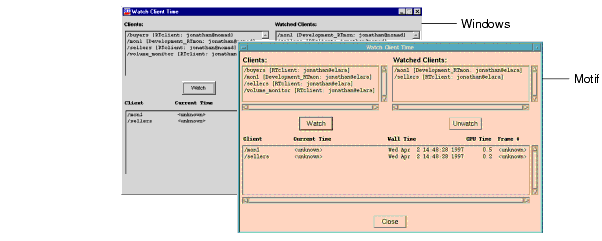
Select Watch > Client Time... from the Main menu to view time information for one or more of the RTclients in your project. The Watch Client Time window appears. This is useful for observing whether all the RTclients are synchronized. The time information displayed in this window is updated in real time, so changes are displayed as they occur.
To watch an RTclient, highlight one or more of the RTclients displayed in the Clients list, then left click on the Watch button. To stop watching an RTclient, highlight the RTclient displayed in the Watched Clients list, and left click on the Unwatch button.
Select Watch > Client Buffer... from the Main menu to view buffer information for one or more of the RTclients in your project. The Watch Client Buffer window appears. This is useful for viewing the read/write buffer and message queue size (in bytes and number of messages). This window is similar to the Watch Client Time window. The buffer information is displayed in real time, and you can use the Watch and Unwatch buttons to select an RTclient for watching or to stop watching.
Select Watch > Client Subjects... from the Main menu to view the subject subscription information for one or more of the RTclients in your project. The Watch Clients Subjects window appears. This is useful for monitoring which subjects your RTclients are subscribing to. Again, the subject information is displayed in real time, and you can use the Watch and Unwatch buttons to select an RTclient for watching or to stop watching.
Select Watch > Subjects Subscribed... from the Main menu to view the RTclients subscribed to one or more subjects. The Watch Clients in Subject window appears. Instead of seeing the subjects that selected RTclients are subscribed to, you see the RTclients listed by the subjects they subscribe to. The RTclient information displayed in this window is updated in real time.
To watch a subject, highlight one or more of the subjects displayed in the Subjects list, then left click on the Watch button. To stop watching a subject, highlight the subject displayed in the Watched Subjects list, and left click on the Unwatch button.
Select Watch > Messages Received... from the Main menu to display the Watch Messages Received window (shown in Figure 38).
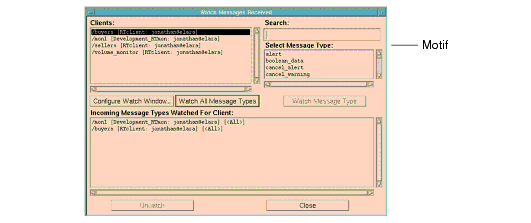
This window displays the known RTclients and the standard and user-defined message types in real time. Select one RTclient from the Clients list and select the Configure Watch Window... button or the Watch All Message Types button. You can also access the same window by highlighting a specific message type from the Select Message Type list and selecting the Watch Message Type button. Here is what you can monitor:
The Watch Messages Received (client name) window appears when you select either the Configure Watch Window, Watch All Message Types, or Watch Message Type buttons.
In the Watch Messages Received window, after you select an RTclient and click on either the Configure Watch Window, Watch All Message Types, or Watch Message Type buttons, a Watch Messages Received (client name) window for that RTclient is shown. Multiple RTclient windows may be running simultaneously. Figure 39 shows the Watch Messages Received (client name) window. The Watch Messages Received (client name) window provides access to information about messages received by an RTclient.
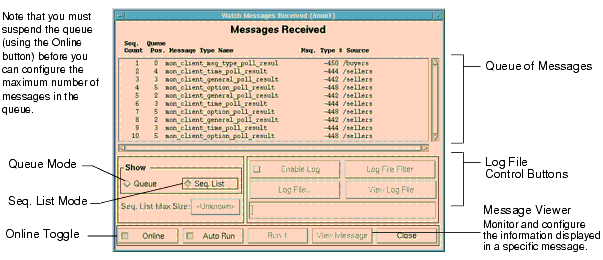
By default, the message types are displayed in real time (in Queue mode). Depending on the data rate of the project, messages may build and clear too quickly to view. When this happens, you need to change the default state of how information is displayed in order to view the information about the messages. The Seq. List mode displays messages in sequential order, allowing you to view information about each message type in the order in which it is received. In this sequential list mode, the list grows indefinitely unless you configure a maximum number of messages to be displayed.
To specify the maximum number of messages to be displayed:
You can save the messages in the queue to a log file, as well as display the log. You can also configure the type of information displayed in the log file using the Log File Filter button.
To start a log file:
Select the Online button to temporarily suspend the monitoring of messages, then select the View Log Message button to display the Message Log Viewer. You can view the log file through RTmon using the Message Log Viewer, as described, or through any text editor.
You can change the information filtered to the log file by changing the defaults in the Message Received Log Options window.
To change the type information filtered to the log file, select Log File Filter in the Watch Messages Received window. The Message Received Log Options window appears. By default, all of the options are enabled. The Message Received log options you can set are:
If both the Log Queue and the Log Messages options are disabled, no information is filtered to the log.
To view detailed information about individual messages, select View Message in the Watch Messages Received window. The Message Viewer window appears. The information displayed in this window is message-specific.
When this window is open, you can highlight any of the messages listed in the Watch Messages Received window and the information specific to the highlighted message is displayed. Additionally, you can change the type of information displayed. For instance, if you do not want to view the message data, which can be very lengthy, toggle the Message Data option off. The settable parameters for this view are:
Select Watch > Messages Sent... from the Main menu to display the Watch Messages Sent window (shown in Figure 40).
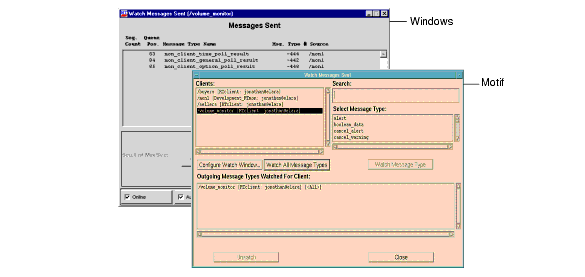
This window displays the known RTclients and the standard and user-defined message types. Select one RTclient from the Clients list. Here is what you can monitor:
The Watch Messages Sent (client name) child window, shown in Figure 41, appears when you select any one of the action buttons in the Watch Messages Sent window.
In the Watch Messages Sent window, after you select an RTclient, either the Configure Watch window, Watch All Message Types, or Watch Message Type button must be pressed to open a Watch Messages Sent (client name) window for that RTclient. Multiple RTclient windows can be displayed simultaneously. Figure 41 shows the Watch Messages Sent (client name) window. The Watch Messages Sent (client name) window provides access to information about messages sent by an RTclient.
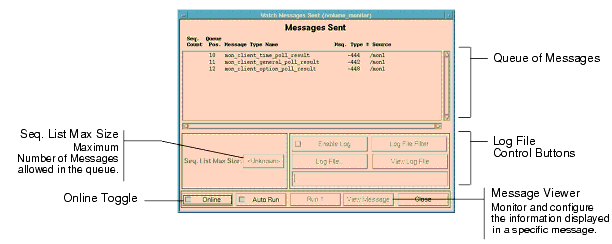
The messages appear in the list in sequential order in which they are sent. The list grows indefinitely unless you configure a maximum number of messages to be displayed.
To specify the maximum number of messages to be displayed:
The Watch Messages Sent window is very similar to the Watch Messages Received window, and the logging functions and options are the same. See Viewing the Message Log File, Changing What Is Filtered to the Log File, and Viewing Information About Individual Messages.
Select Watch > Server Connections... from the Main menu to display the Watch Server Connections window. The Watch Server Connections window presents an easy to read, real-time graphical display of information about the messages sent and received and the bytes sent and received from the RTserver.
The graphical displays present the delta between polls, as shown in Figure 42.
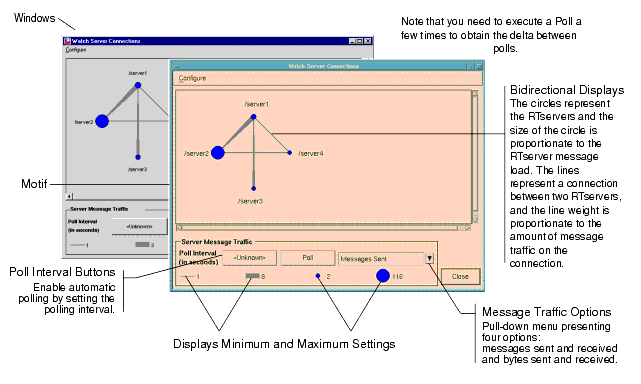
Select Configure > Metrics... from the Watch Server Connections window to display the Configure Metrics window. Use this window to configure the metric values used in the graphical displays. You can also use the Configure pull-down menu to scale the view to the current data.
Select Poll > Server Information... from the Main menu to display the Server Information window, shown in Figure 43. This window lists the RTservers in your project. You can poll and monitor information about each of the RTservers.
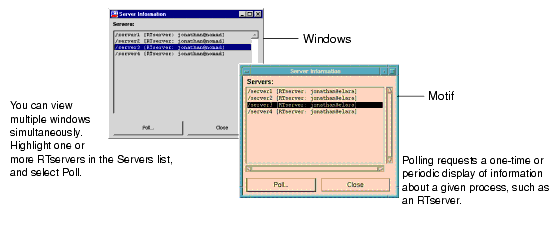
To display detailed monitoring information about one or more of the RTservers listed in the window, highlight the RTserver(s), and press the Poll button. The Server Information (server name) window appears, as shown in Figure 44.
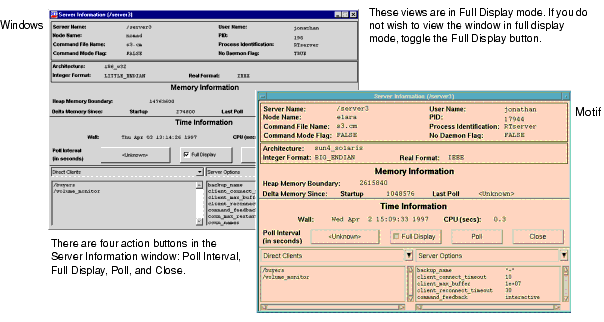
This table presents a description of the information fields in the Server Information (server name) window when in full display mode. Note that those fields displayed only when in full display mode are noted with an asterisk.
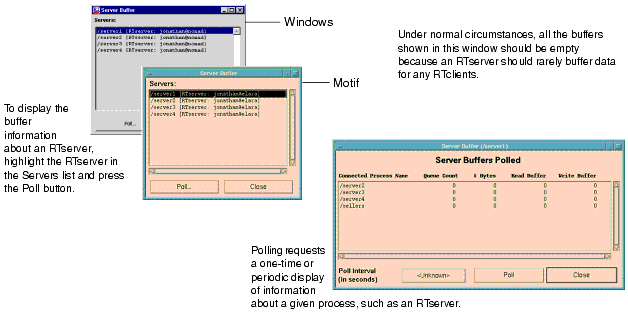
Select Poll > Server Buffer... from the Main menu to display the Server Buffer window, as shown in Figure 45. This window lists the RTservers in your project. To monitor buffer information for an RTserver, select one or more of the RTservers and click on the Poll button.
Select Poll > Client Information... to display the Client Information window. This window lists the RTclients in your project. There are four action buttons in the Client Information window:
To display detailed monitoring information about the RTclients, highlight one or more of the RTclients in the Clients list and click on the Poll button. The Client Information (client name) window appears, which is very similar to the Server Information window shown in Figure 44.
The informational fields in the Client Information window when in full display mode are:
Select Poll > Client Message Traffic... from the Main menu to display the Client Message Traffic window. This window displays the RTclients in your project and the associated incoming and outgoing message traffic for the specified RTclient. To monitor the traffic information, highlight one or more of the RTclients from the Clients list, and then press the Poll button. The RTclients appear in the Clients Polled area.
When a poll interval is configured using the Poll Interval button, the information displayed in this window is updated at the specified interval.
Select Poll > Client Subject Message Traffic... from the Main menu to display the Client Subject Message Traffic window. This window displays the RTclients in your project and the associated incoming and outgoing message traffic for one or more of the client-subject pairs in your project. To monitor the traffic information, highlight one or more of the RTclients from the Clients list and one or more of the subjects from the Subjects list, and then press the Poll button. The client-subject pairs appear in the Clients Polled area.
To select an RTclient and all the subjects to which it is subscribing, highlight the RTclient from the Clients list, and then press on the Find Subjects button. Likewise, to select a subject and all the RTclients subscribed to the subject, highlight the subject from the Subjects list and press the Find Clients button.
To remove all poll information from the Client Subjects Polled area, press the Reset button.
|
TIBCO SmartSockets™ User’s Guide Software Release 6.8, July 2006 Copyright © TIBCO Software Inc. All rights reserved www.tibco.com |