 |
The RTmon GDI has been deprecated and may be removed in a future release.
|
To build and send a message to a subject, press the Send button from the Main RTmon window. The Send Message window appears.
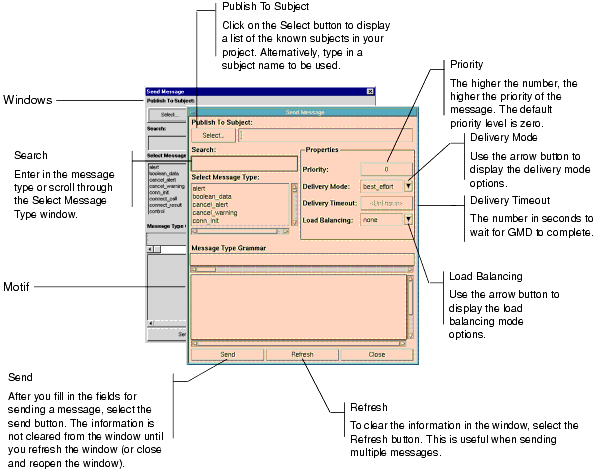
There are many built-in attributes in the Send Message window. Figure 46 highlights the features built into this window.
To send a message:
When a message type is selected and there is a grammar specified for that message type, it is displayed in the top line of the Message Type Grammar field. Additionally, one or more fields appear in the bottom portion of the window, prompting you for more information. Depending on the message type, the required information may be a simple text entry prompt, an editor of the appropriate type, or a list of legal values. The types of prompts and editors are defined in the table. If desired, set the priority of the message. The default is zero.
For more information about sending messages, refer to Chapter 1, Messages.
The prompts and editors used when sending messages are:
|
Prompts
|
Editors
|
|---|---|
|
Simple Entry Prompt
|
Most of the prompts for fields in the Send Message window are simple entry boxes (INT2, INT4, Identifier, REAL4 and REAL8). Enter the value and press the Return key.
The value must be of the type specified in brackets above the box. If it is not, you are notified of an error.
|
|
Group Entry Prompt
|
Groups entry prompts ([Group]) have a slightly different function from Simple entry prompts. This entry prompt accepts an integer that specifies how many entry prompts to provide of the types listed inside the curly braces { 1..3 } in the Message Type Grammar field.
When an integer is typed into this box and the Return key is pressed, that number of entry prompts appears below the group entry prompt.
See the discussion of groups in the section Grammar.
|
|
Message Entry Prompt
|
Message entry prompts ([Message]) provide a Build Message window. This window is similar to the Send Message window, except that it does not provide as many sending options for the message.
A message built with the Build Message window is a message within a message.
|
|
String Entry Prompt
|
String entry prompts ([String]) are similar to the simple entry prompt, with the addition of a More button, invoking a String Editor.
The String Editor offers more capabilities than the string entry prompt. In the String Editor, you can:
Once a multi-line string has been entered using the String Editor, it is viewable in the string entry prompt by using the arrow keys.
|
|
Boolean Entry Prompt
|
Boolean entry prompts ([BOOL]) allow you to choose among the values Unknown, True, and False.
|
|
Array and Binary Entry Prompts (INT2, INT4, STR, REAL4, REAL8)
|
If an entry prompt shows [INT2_ARRAY], [INT4_ARRAY], [STR_ ARRAY], [REAL4_ARRAY], [REAL8_ARRAY], or [BINARY] as its type, left click on the box labeled <Empty> brings up an Item List Entry editor.
This editor allows you to build lists of values of the particular type displayed on the entry prompt you selected:
For some types of items, an additional button labeled More... is associated with each item in the list. Left click on this button to bring up a String Editor. When the list is complete, left click on the OK button.
|
|
TIBCO SmartSockets™ User’s Guide Software Release 6.8, July 2006 Copyright © TIBCO Software Inc. All rights reserved www.tibco.com |