The previous exercise shows how RTclients automatically restart RTserver when the connection is broken, and continue operating. During the time it takes to detect and recover from the loss of RTserver, it is possible that a message could be lost in the transition. To achieve a higher level of fault tolerance, it is possible to have your RTclients automatically failover to a new, already running, RTserver if the RTclients’s connection with its current RTserver is broken.
This hot failover to a new RTserver that is already running can be achieved by simply overriding the default values of some options, all without writing a single line of code. The key here is the setting of the Server_Names option. It should be set to contain a list of the nodes where the RTservers are running. For example, if there are RTservers running on three machines A, B, and C, the Server_Names option should be set as:
So that the RTclient process automatically fails over immediately, you need to put the start prefix start_on_demand in front of each of your RTserver names; for example, start_on_demand:A. This prefix causes the RTclient to only try to start RTserver if the RTclient process has tried all the names in Server_Names at least once. This is useful for only starting RTserver if an existing one cannot be found.
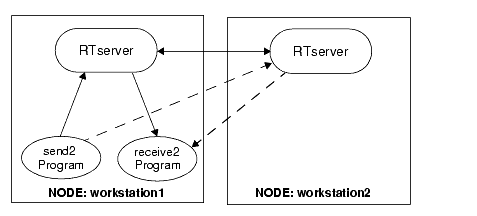
Let’s create an example where you have two RTserver processes running, each on a different machine (say workstation1 and workstation2). You have a sending program (send2.c) and a receiving program (receive2.c) both connected to the same RTserver on workstation1. You then kill the RTserver process on workstation1 and watch both sending and receiving programs automatically fail over to the RTserver already running on workstation2. The sample start configuration is shown in Figure 10. The solid lines from the two processes to RTserver show the initial configuration. The dashed lines show the configuration after the RTserver process is killed on workstation1, and the clients (send2 and receive2) connect to the RTserver process running on workstation2.
To illustrate this, you first need to get two RTserver processes running on different machines.
Create an rtserver.cm file
Using an editor of choice, create an rtserver.cm text file, which is automatically read by RTserver at startup, with one line in it that reads:
Be sure to put the names of your machines in place of machine1 and machine2. The Server_Names option is used by RTserver to find other RTserver to which it should connect.
Start an RTserver
Once you have saved the file, start an RTserver running on your local machine (machine1), with this command:
 |
On platforms that support both 32- and 64-bit, use the rtserver64 command to run the 64-bit RTserver.
|
Start another RTserver on a remote node
On your current display, in a separate window, login to a remote node (use rlogin, telnet, or whatever command is appropriate for the operating system you are on) and start another RTserver, using this command:
You now have RTservers running on two different machines. You next need to get the send2 and receive2 programs running and connected to one of the RTservers.
Copy the send2.c and send2.cm files
Copy the files send2.c and send2.cm into your current working directory. Under Windows copy the makefile snd2w32m.mak into your current directory.
Compile and link the send2.c program
Compile and link the send2.c program. The send2.cm file looks like this:
setopt project               smartsockets
setopt unique_subject        /lesson6/send2
setopt server_start_delay    0.0
setopt server_write_timeout  1.0
setopt server_names start_on_demand:machine1,
start_on_demand:machine2
Edit the send2.cm file
Edit the send2.cm file and replace the node names machine1 and machine2 with the two node names you used in the rtserver.cm file. Save the file.
Copy the receive2.c and receive2.cm files
Copy the files receive2.c and receive2.cm into your current working directory. Under Windows copy the makefile rcv2w32m.mak into your current directory.
Compile and link the receive2.c program
Compile and link the receive2.c program.
The receive2.cm file looks like this example:
setopt project smartsockets setopt unique_subject /lesson6/receive2 setopt server_start_delay 0.0 setopt server_read_timeout 1.0 setopt server_names start_on_demand:machine1,start_on_demand:machine2
Edit the receive2.cm file the same as you edited the send2.cm file
Edit the receive2.cm file and replace the node names machine1 and machine2 with the two node names you used earlier. Save the file.
Start the receiving program
In a new window, start the receiving program on machine1:
Start the sending program
In another window, start the sending program on machine1:
The receiving and sending programs start printing out the message count numbers of the messages they are sending and receiving.
Stop the RTserver on that machine
In the window where you started RTserver on machine1, stop RTserver with this command:
It takes a moment for this command to stop RTserver on machine1. However, when RTserver dies, note that the receiving and sending programs detect the failure immediately and automatically fail over to the next RTserver in their Server_Names option list, the one running on machine2.
You should see output similar to this in the window where you started the receiving program:
...
Message Count = 8
Message Count = 9
Message Count = 10
WARNING: Lost connection to RTserver: error code = 10.
Attempting to reconnect to RTserver.
Connecting to project <smartsockets> on <machine1> RTserver.
Using local protocol.
connect: Connection refused
Could not connect to <machine1> RTserver.
Connecting to project <smartsockets> on <machine1> RTserver.
Using tcp protocol.
connect: Connection refused
Could not connect to <machine1> RTserver.
Skipping starting <start_on_demand:machine1> RTserver.
Connecting to project <smartsockets> on <machine2> RTserver.
Using local protocol.
Could not connect to <machine2> RTserver.
Connecting to project <smartsockets> on <machine2> RTserver.
Using tcp protocol.
Message from RTserver: Connection established.
Start subscribing to subject </lesson6/receive2> again.
Start subscribing to subject </tutorial/lesson6> again.
Message Count = 11
Message Count = 12
Message Count = 13
...
You see similar output in the window where you started the sending program:
...
Sending message 8
Sending message 9
Sending message 10
WARNING: Lost connection to RTserver: error code = 10.
Attempting to reconnect to RTserver.
Connecting to project <smartsockets> on <machine1> RTserver.
Using local protocol.
connect: Connection refused
Could not connect to <machine1> RTserver.
Connecting to project <smartsockets> on <machine1> RTserver.
Using tcp protocol.
connect: Connection refused
Could not connect to <machine1> RTserver.
Skipping starting <start_on_demand:machine1> RTserver.
Connecting to project <smartsockets> on <machine2> RTserver.
Using local protocol.
Could not connect to <machine2> RTserver.
Connecting to project <smartsockets> on <machine2> RTserver.
Using tcp protocol.
Message from RTserver: Connection established.
Start subscribing to subject </lesson6/send2> again.
Sending message 11
Sending message 12
Sending message 13
...
The main thing to notice here is that despite the fact that an RTserver died, no messages are lost. In the previous section, when an RTserver failed, you restarted it and a message was lost in the time it took to detect and restart it. In this section, when RTserver failed, you quickly connected to another RTserver that was already running. This allowed you to achieve a higher level of fault tolerance and keep operating without losing any messages. (In your example, it may happen that a message is lost; however, it is with a lower probability than in the previous section. If you wish to ensure that no messages are lost, you need to use guaranteed message delivery.)
There are several RTclient options that can be set to control how quickly failures are detected and recovered from. These options are: Server_Keep_Alive_Timeout, Server_Delivery_Timeout, Server_Names, Server_Read_Timeout, Server_Start_Delay, Server_Start_Max_Tries, Server_Start_Timeout, and Server_Write_Timeout. More details on these options can be found in the TIBCO SmartSockets User’s Guide.
In addition to RTclient options, there are several RTserver options that can be set to control how quickly RTserver problems are detected and recovered from. These options are Client_Connect_Timeout, Client_Reconnect_Timeout, Gmd_Publish_Timeout, Server_Connect_Timeout, Server_Keep_Alive_Timeout, Server_Read_Timeout, Server_Reconnect_Interval, and Socket_Connect_Timeout. More details on these options can be found in the TIBCO SmartSockets User’s Guide.
Stop all RTclients
Before proceeding to the next section, stop the RTserver and its RTclients with this command:
|
TIBCO SmartSockets™ Tutorial Software Release 6.8, July 2006 Copyright © TIBCO Software Inc. All rights reserved www.tibco.com |