 |
The GDI portion of RTmon has been deprecated and may be removed in a future release.
|
RTmon is a very powerful tool that you can use to monitor and control your entire distributed application through a graphical interface, called the RTmon GDI or through a command-mode interface, called the RTmon Command Interface (CI). The RTmon GDI provides a point-and-click tool for monitoring your application in real time, allowing you to watch critical IPC information such as the number of messages a process has in its message queue. The RTmon Main window presents an animated graphical tree of a project, with nodes in the tree representing RTclients, the subjects to which they are subscribed, and the RTservers running. As changes occur, such as a process leaves the project, the Project Tree is updated in real time. The RTmon GDI even allows you to look at individual messages and their contents as they are passed from program to program.
One of the principal features of RTmon is that it is non-intrusive. It allows you to monitor, debug, and log information in a project without changing the running processes. RTmon also provides real-time system usage information on processes, such as CPU and memory resources. This is useful for stopping a process that is using excessive system resources (with a CONTROL message whose data part consists of the string "quit force").
You can even build a message in RTmon GDI, using only the point-and-click interface, and send it to one or more processes in the project.
The best way to learn how to use RTmon is to get it up and running.
You need a project to monitor first, so start the send2 and receive programs each in separate windows.
Start the receiving program
First start the receiving program:
Start the sending program
Then, after a few moments, start the sending program:
Copy the rtmon.cm file
Copy the file rtmon.cm into your working directory. The rtmon.cm file stores commands executed by the rtmon program during initialization.
Start the RTmon GDI
Start the RTmon GDI running in your third window using the rtmon command, which is the same for all three platforms presented in this tutorial:
It takes a moment for RTmon to initialize.
Go to the Project Browser window
You are presented with an Information dialog box telling you that you did not set the Project. Click OK. The Project Browser window appears.
Create an rtmon.com startup command file
To prevent this Information dialog box from coming up in the future, create an rtmon.cm startup command file (text) with the Project option set as shown:
The Project Browser window presents a list of available projects (once you set your rtmon.cm file, smartsockets is listed as one of the projects.)
Change the selected project
Click smartsockets, then click Change Project. When the Confirmation dialog comes up to disconnect from the RTserver, click OK. To close the Project Browser window, click Close.
You are now monitoring the project in real time.
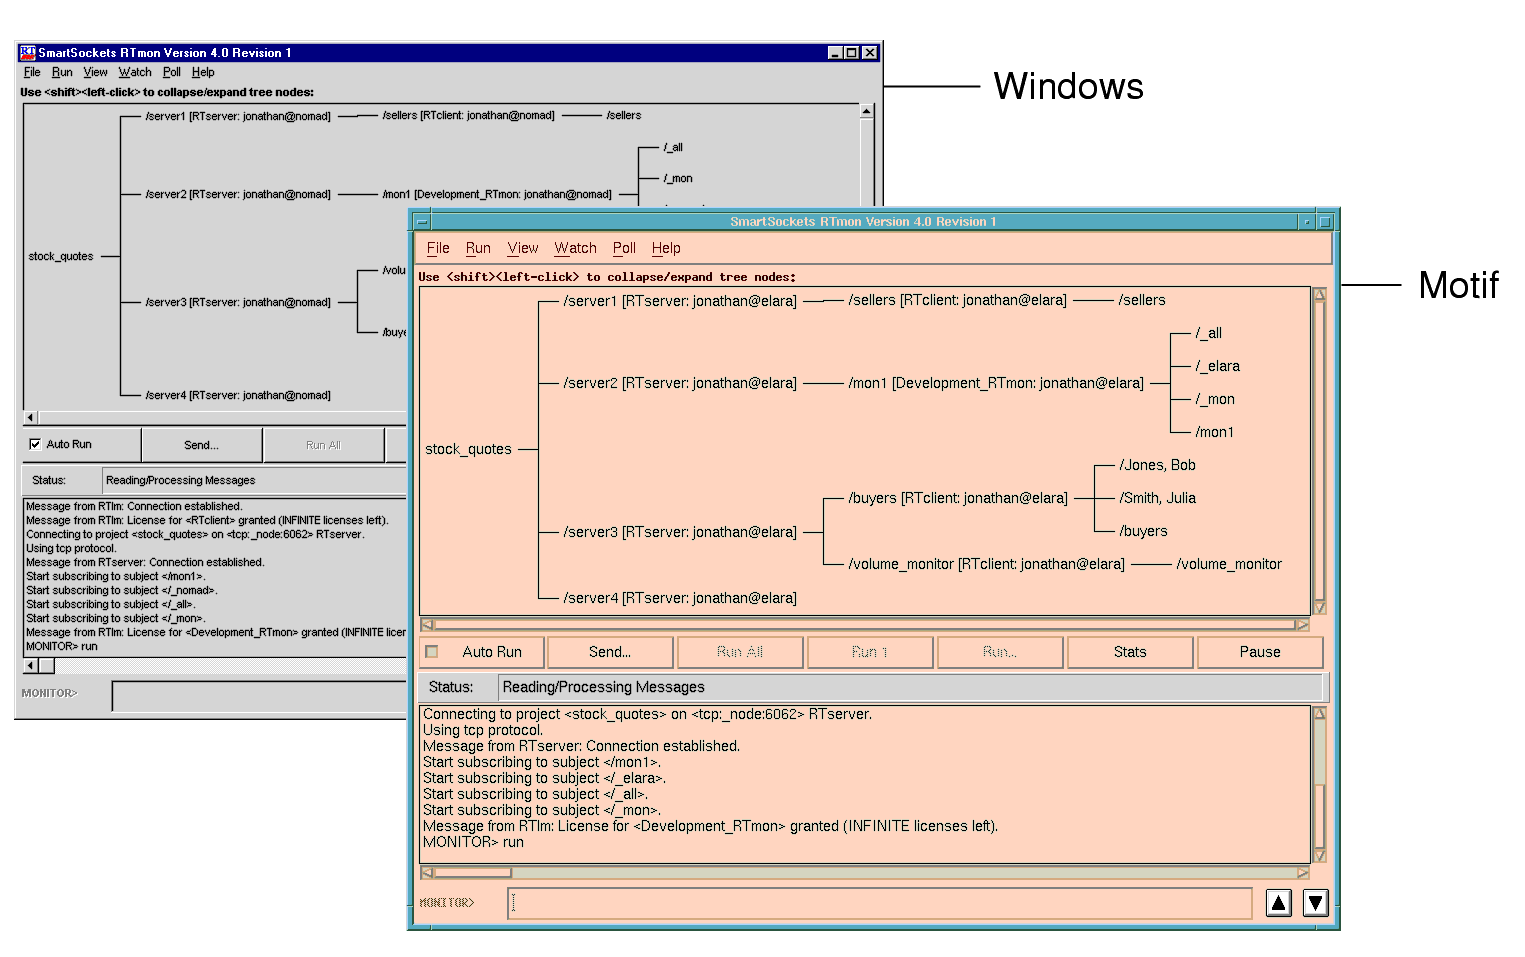
The Main RTmon window is shown in Figure 8.

Notice the graphical tree of the project. From left to right, it shows the name of the project, then all the RTservers running in the project, followed by the RTclients, and at the far-right the subjects to which each of the RTclients are subscribing are displayed.
The Project Tree should be showing three RTclients: sender, receiver, and RTmon. Note that RTmon is just another RTclient, and, in fact, you can even use RTmon to monitor other RTmons, including itself.
This Project Tree is animated. As changes occur in the project, the tree is updated in real time. For example, if a process unsubscribes from a subject, you would see that subject disappear from the tree. This tree is an excellent way of getting a visual picture of your complete project.
All the items in the Project Tree are selectable. Double click on any item in the tree and a window appears from which you can poll or watch more information.
Let’s make a change in the tree by sending a CONTROL message to the sending program (specified in the tree by its unique subject, /lesson5/sender) to "quit force", which stops the process.
Go to the Send Message window
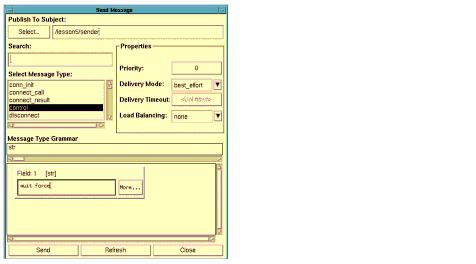
In the middle of the Main window, right below the Project Tree, there are a series of buttons. Click Send.... This brings up the Send Message window, shown in Figure 9. (Figure 9 shows the Motif Send Message window but the Windows version has the same functions.)

To build the message, first set the subject to where the message is going to be sent.
Select a subject
Click Select.... In the Subject Selection box, click /lesson5/sender and click OK (or simply type /lesson5/sender in the Publish to Subject field located to the right of the Select button).
Now the destination subject is set. You are sending the message to the /lesson5/sender subject.
Select the message type to send
In the Select Message Type scroll box, select the control message type. In the bottom part of this window, a text entry box for Field: 1 appears. Enter this string:
The Send Message window should look similar to the window displayed in Figure 9.
Send the message
Now click Send to send the message to the remote process to terminate it.
An Information box appears, notifying you that the message was sent successfully.
Click OK
Upon receipt of the CONTROL message, send2 stops and the Project Tree in the Main window is updated in real time to reflect the fact that the process is no longer running.
Start the sending program again
In a separate window, start the sending program again:
Notice how the Project Tree is again updated when the process joins the project.
Stop all running processes
To clean up and stop all the running processes, including RTmon, construct another CONTROL message, sending this message to the _all subject that all processes automatically subscribed to. In the Field box, enter quit force again. Click Send to stop all the processes.
RTmon disappears from your screen when it receives the CONTROL message.
|
TIBCO SmartSockets™ Tutorial Software Release 6.8, July 2006 Copyright © TIBCO Software Inc. All rights reserved www.tibco.com |